Category Archives: HF

Antenna on a Budget

BLUF – Construct a 20 meter dipole fed with coax using a 1:1 balun

Ask a forum what kind of antenna you should use, and you’ll get as many suggestions as there are digital modes in amateur radio. Opinions are as diverse as others have had so many experiences with different setups, materials, budgets, and needs. So, I let my budget and requirements do the selection.

Like I’ve posted before, this is a hobby on a budget, and I don’t have the money to put up a tower with multi-band yagis on a rotator in the back yard. What I do have is my amateur license knowledge, a tree (yes, only one tree in my yard), ingenuity, and a little time.

Since I’m on a budget, I figured that maybe I’ll just stick with one or two bands to cut cost and complication. What’s wrong with a dipole? Absolutely *nothing*! But how do I go about making the dipole, hanging it, and getting on the air?

First, select the band. In listening through the bands, and watching for band openings, it seemed that the 20 meter band is probably the best one to get on and have some fun. The 20 meter band is from 14Mhz to 14.350Mhz. Split the difference, and you get 14.175Mhz. Use that in the handbook dipole formula (468 รท frequency in Mhz = full dipole length), and we end up with 33.019 feet, so let’s call it 33 feet. That means that for a 1/2 wave dipole, each side will need to be 16.5 feet.

So, what to make the dipole out of? Something cheap! I found that 16 gauge wire will probably be the best compromise of strength, weight, power handling, and cost. Speaker wire is cheap, and you only have to cut once, and you have both sides of your dipole! So, 100′ of 16 gauge speaker wire was $20. I can live with that, and will even have a lot left over for more antennas!

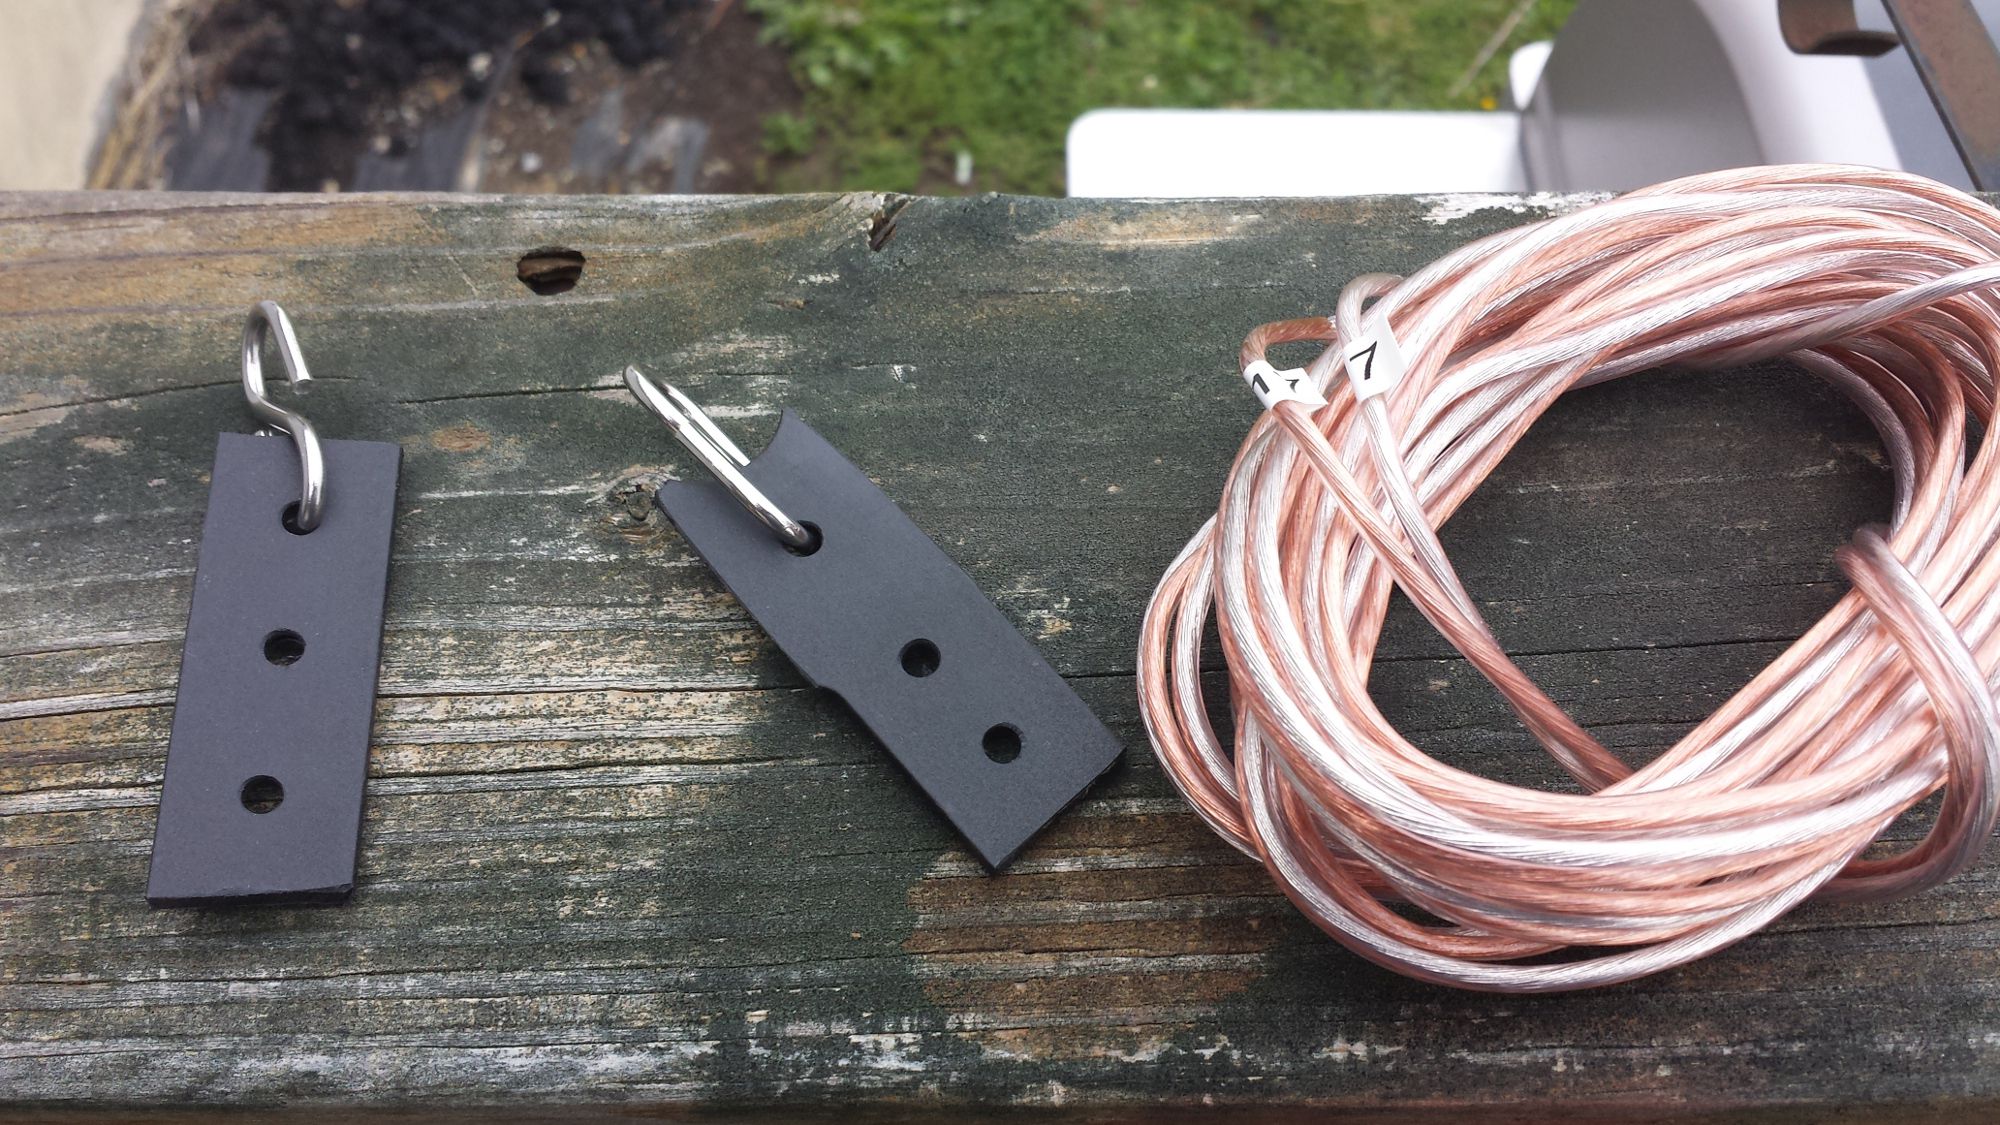
Cut the speaker wire at 16.5 feet, split the speaker wire into 2 separate wires, and solder on loop terminals (crimp-on, but solder to make sure it stays and weathers well).

Antenna elements covered. The only feedline I have is some Radio Shack RG58 I bought when they were going out of business, so I’m stuck with that. Now we have to make sure we don’t bring current back into the shack due to the mismatch of “balanced” dipole, and “unbalanced” coax. Balun needs is a HUGE subject, so if you want to read more, I suggest starting here:

Baluns- what they do and how they do it

I decided to construct a 1:1 current balun using a dual core design. More on that construction in a later article, but if you want to see what I used for design, go here for the Guanella balun details. I ended up with the balun below.

20150305_193032

20150305_205202

OK, we’re starting to understand where we’re going, so let’s see how we’ll get this thing in the air.

Looking around the back yard, I have one tree. That’s one point for hanging things, so I needed to make one more point. Ended up using an old basketball goal pole, and attached it to the corner of the back deck. Two points now, good to go.

I tried to think long term, ease of use, and flexibility. What I ended up with is a system using simple 550 paracord strung up between the two points with excess on the ends to allow for lowering and raising the system from either end.

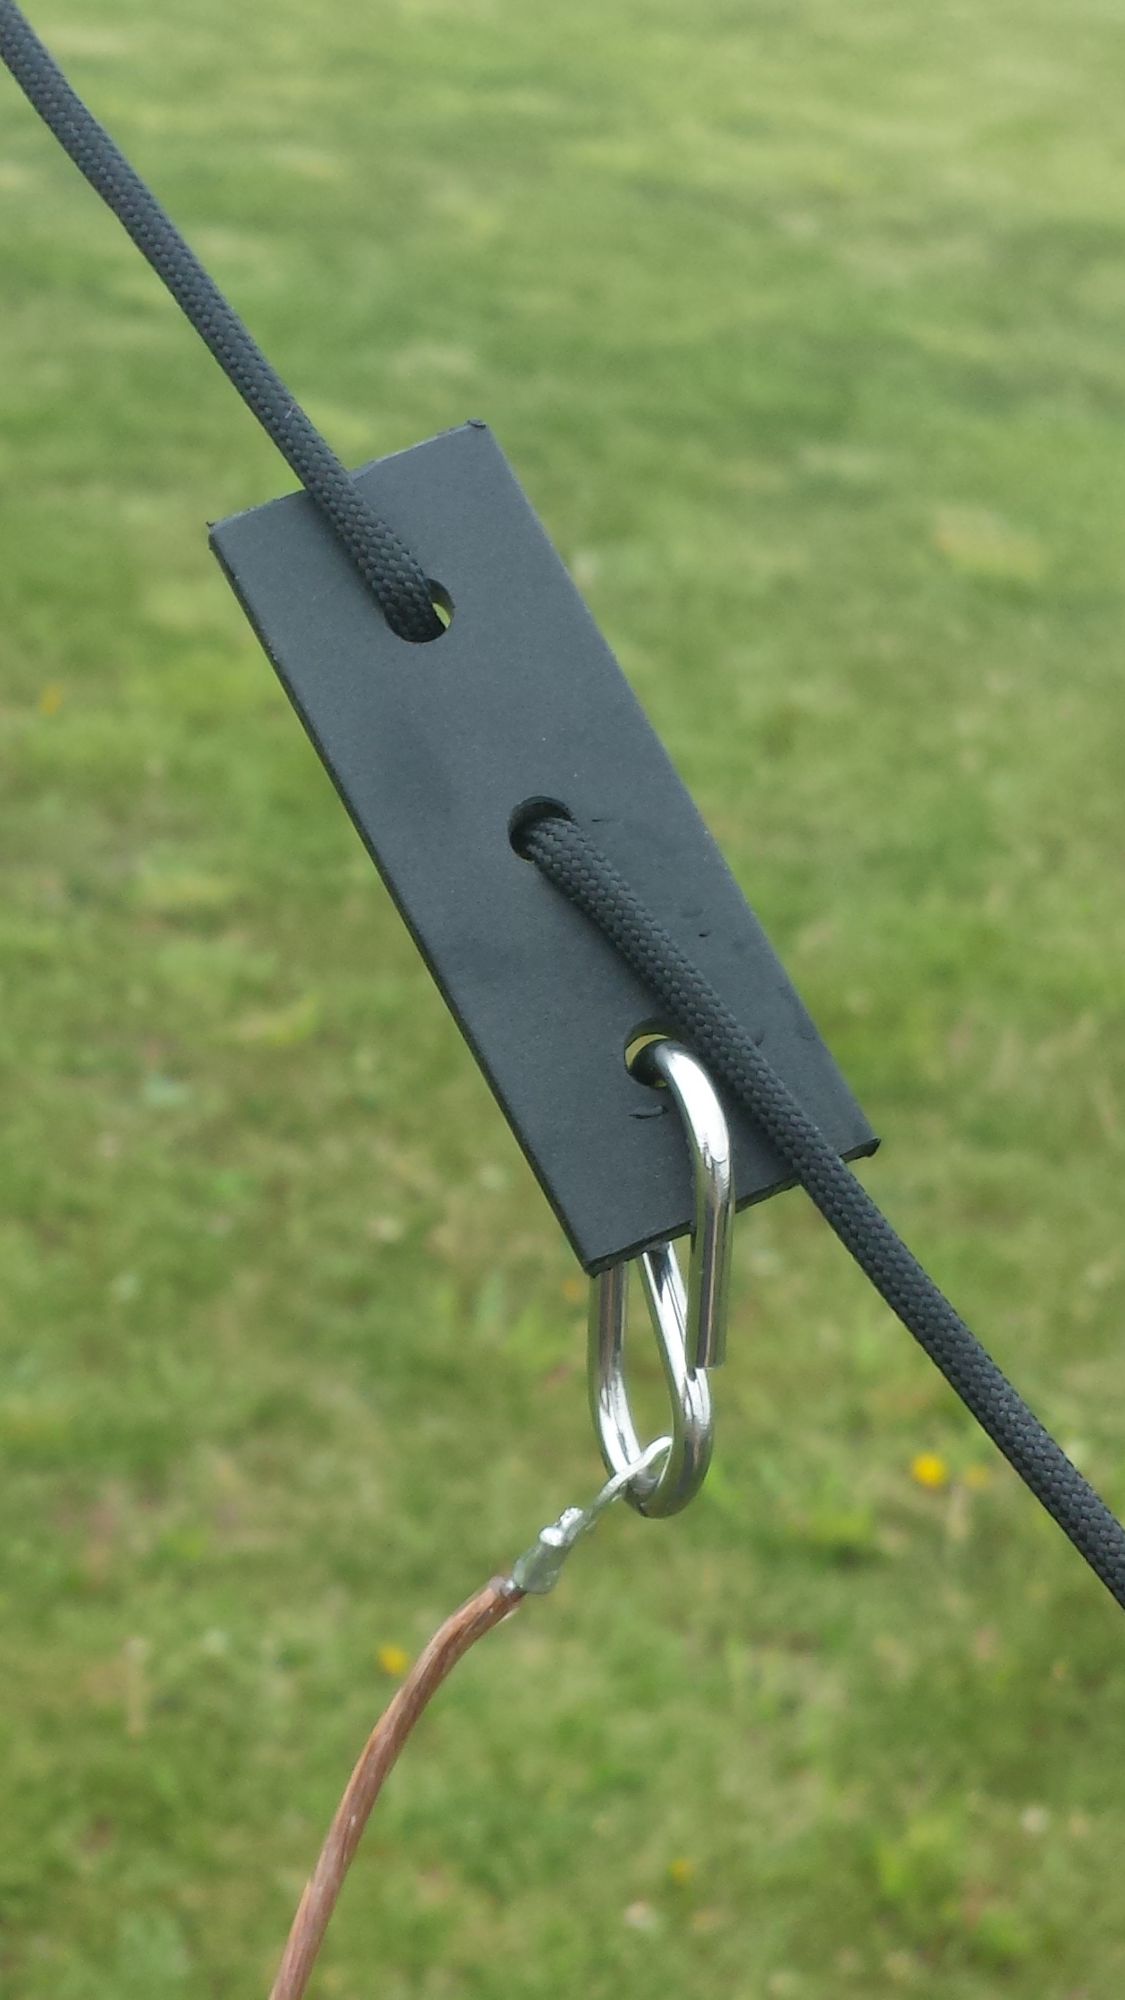
In order to hang the antenna, I decided to simply build the balun with an eye bolt to attach to the line. The antenna leads attach to the balun, and then ends of the dipole attach to some “line tensioners” I made from an old plastic spatula handle. That would allow me to slide the connection point for the antenna anywhere along the hung paracord.

dipole-and-anchors

Hangs like: balun-and-tensioners

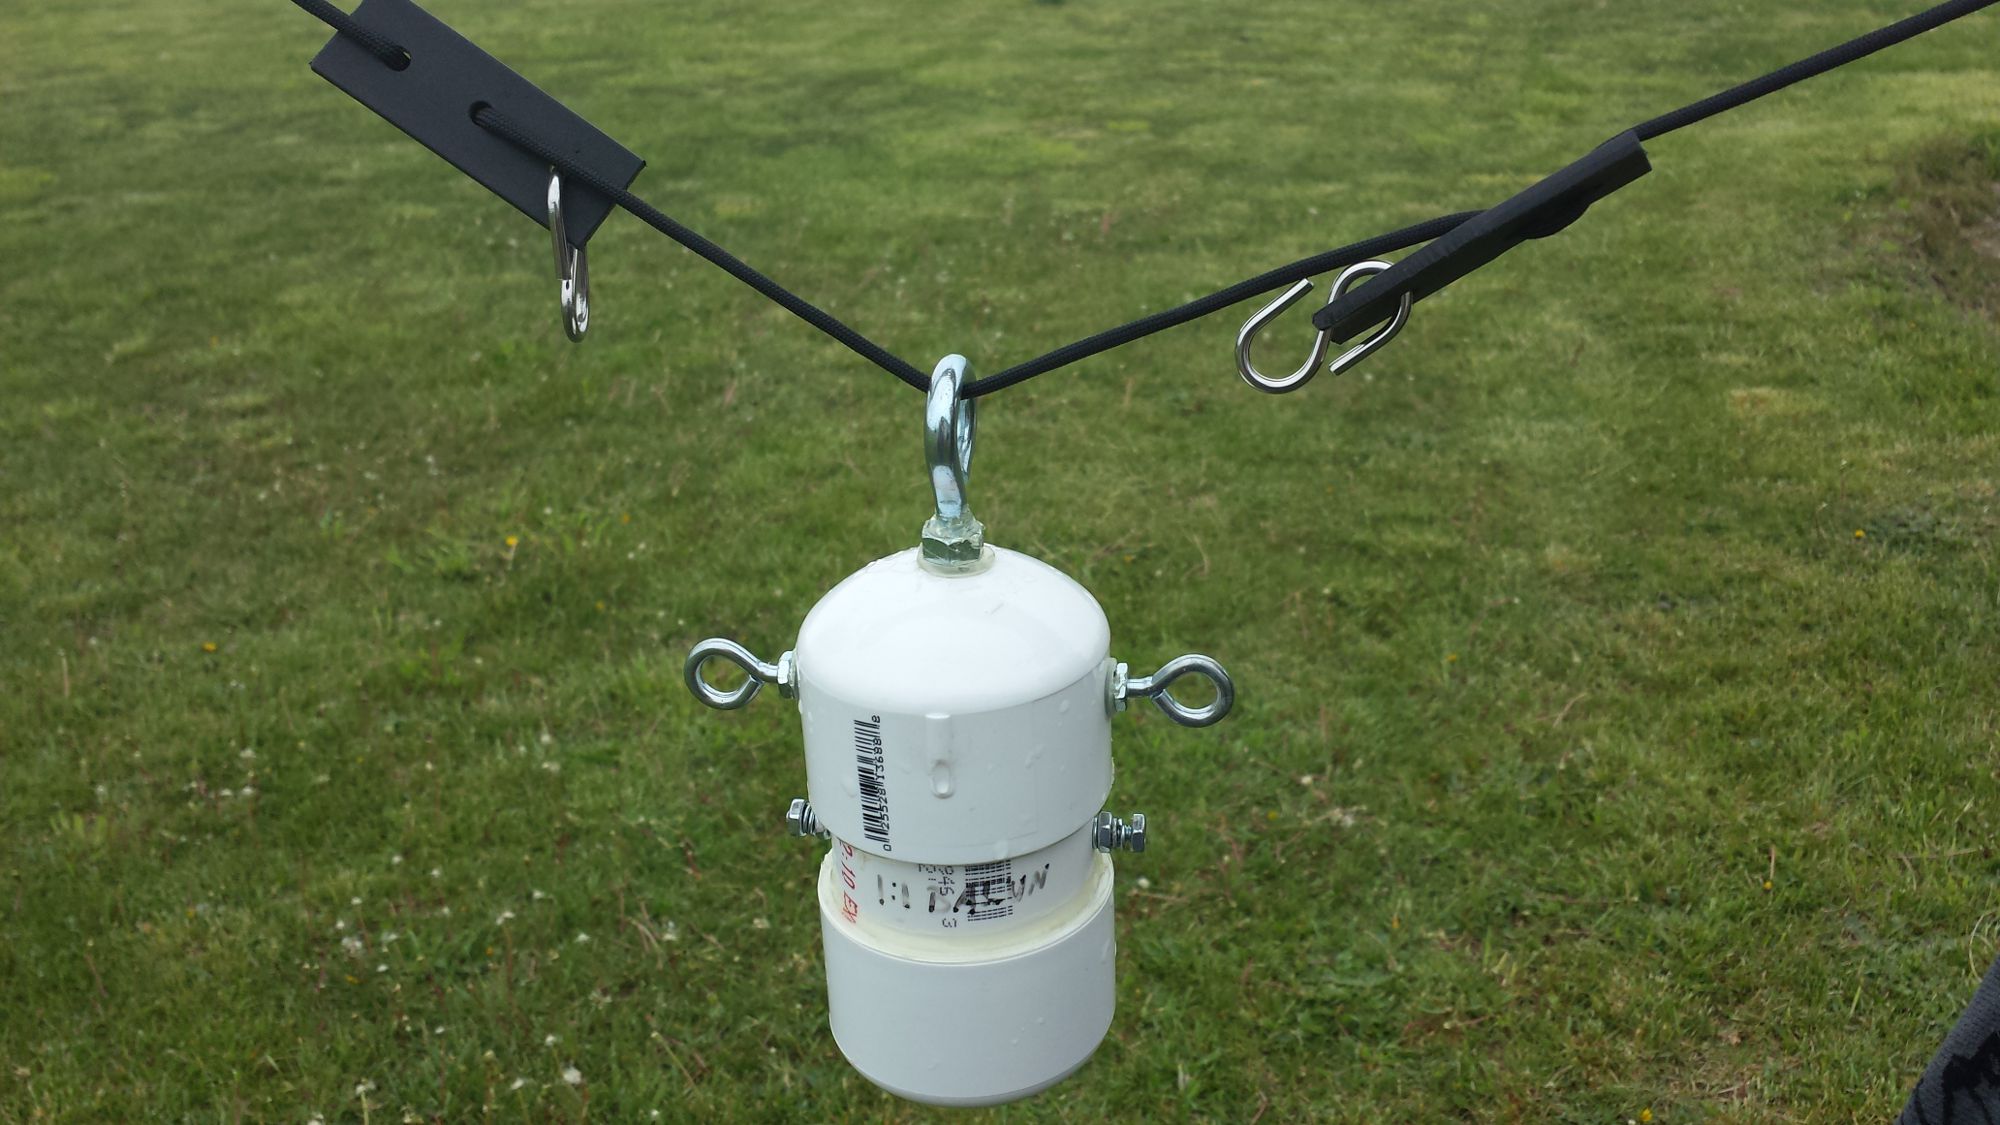
Just slide the tensioners along the paracord to wherever you need the ends of the antenna:

:tensioner-closeup

Closeup of balun with wires attached (17 meter dipole shown).

balun-wire-closup

End result: dipole-hanging

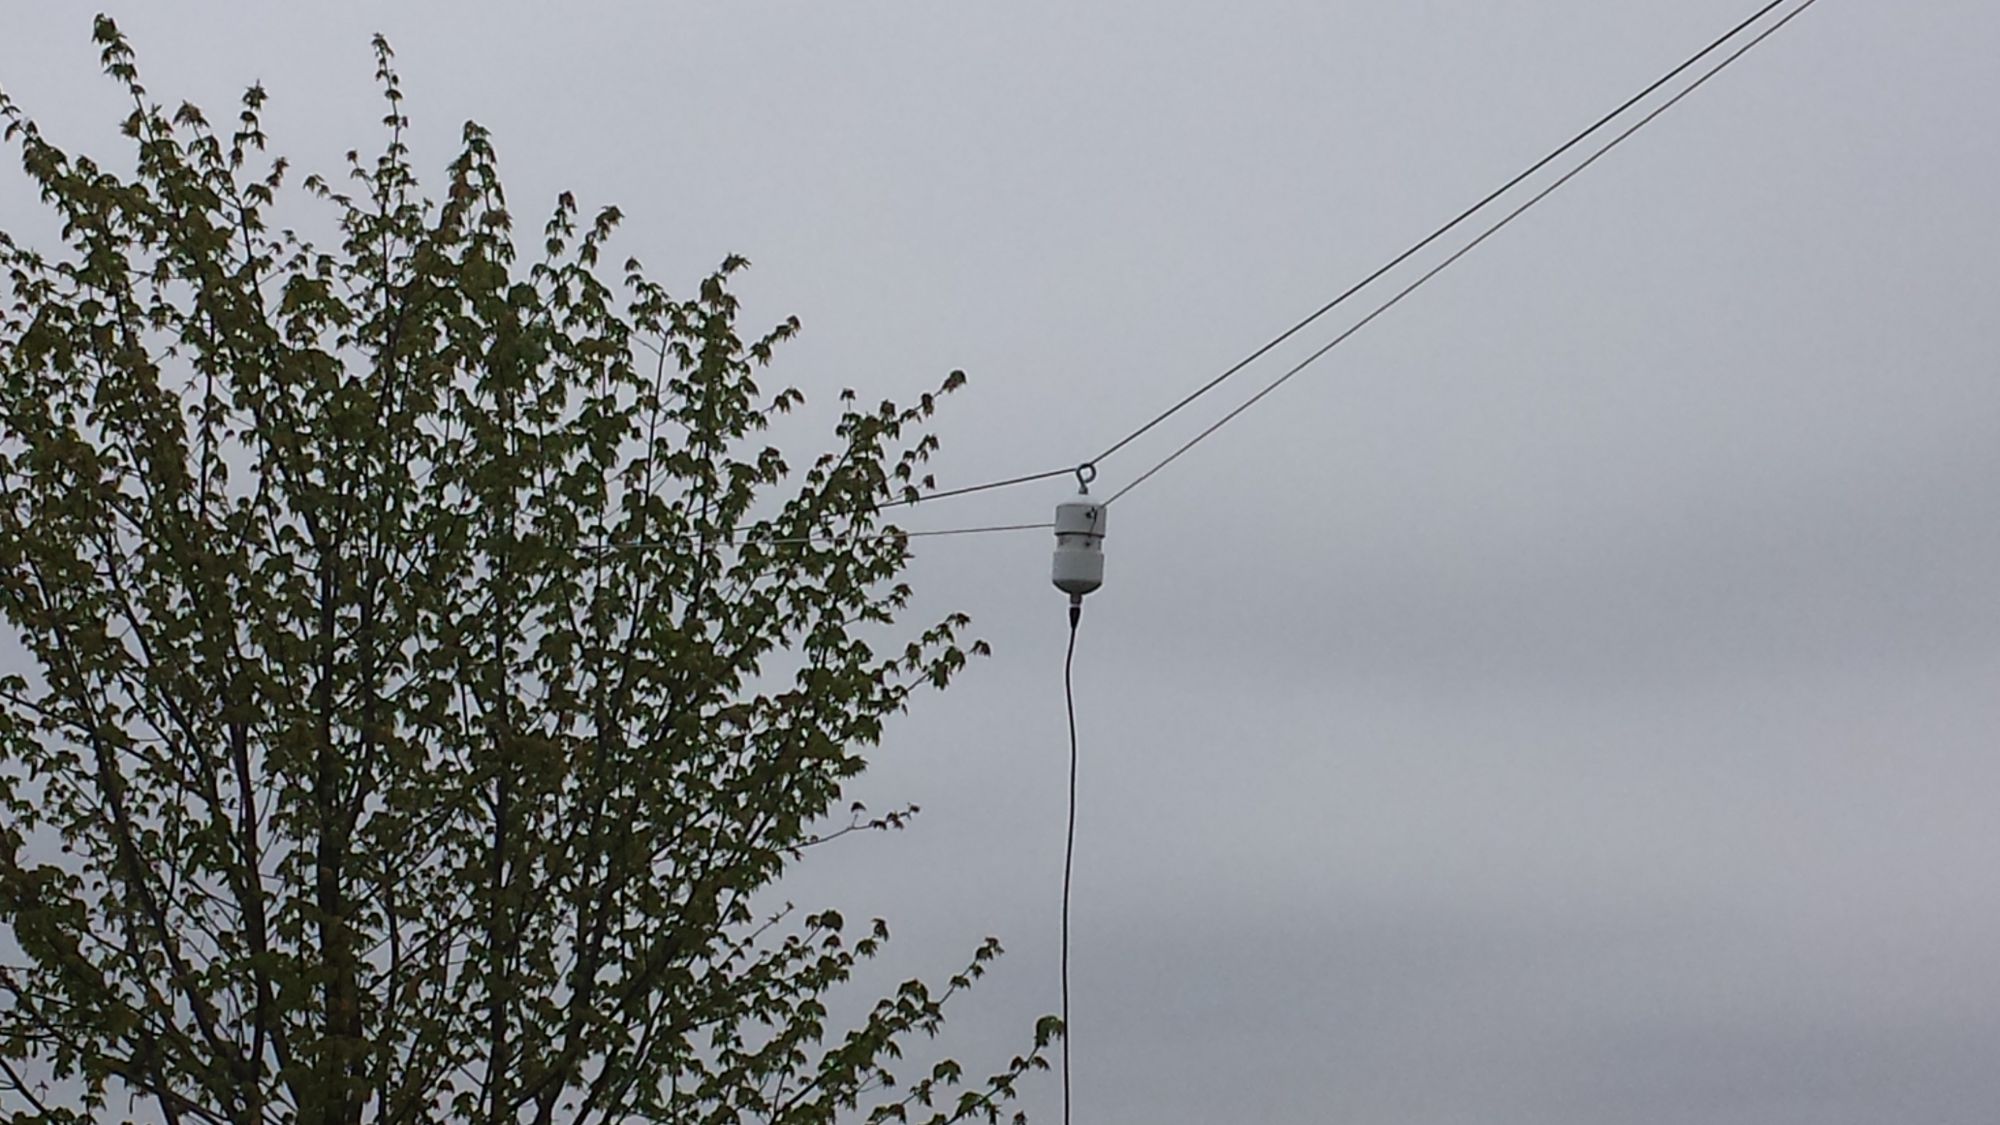
How’s it working? So far, so good! I’ve made contacts all the way to Romania, Italy, and South Africa on 20 meters!

It’s a simple design, and should allow me to simply switch out dipole wires for different bands. I’ve cut wires for 10, 17 (shown in pics), 20, and 40, and have made contacts on each. Changing bands takes about 7 minutes.

I haven’t checked SWR, but it should be close enough.

73


My New (to me) Kenwood TS-430S

Finally got a rig!

After a month of looking, reading, researching, and patience, I was finally able to purchase an HF rig that gives me just enough functionality to keep me busy for a while!kenwood_ts-430s_front

Why the Kenwood TS-430S? Because it fit my requirements!

Requirements:

  • HF rig < $300
  • Name brand
  • SSB/CW/AM modes
  • Operate in phone and CW
  • Frequency display counter
  • Lots of knobs and buttons
  • No integrated power supply or antenna tuner
  • Parts available
  • Plenty of documentation available on the Internet
  • Easy to repair
  • Modifications available
  • Good reviews on eHam.net
  • Non-smoking environment

How did I get to this list of requirements?

I’ll touch on a few of the “not so obvious ones” here.

I wanted a modular system that I can build with individual components that I can leverage in the future for expansion and extending capabilities. I especially didn’t want to trust an older system to have all of it’s components functioning flawlessly. Power supplies and antenna tuners are things that can often get abused, are easy to repair/replace, and would be much more difficult to fix if they share integrated circuits with a larger system.

I wanted to do phone operations and also have the ability to get into CW, all while actually knowing at a glance what frequency I’m on.

The name brand requirement is really just an extension of the “supportability” of the system. If you go with some off-the-wall brand, you are risking component availability, as well as others not being familiar with the system (because face it, you’re going to need some help!).

I’m a very hands-on kind of person. Having dials, knobs, and buttons that I need to manipulate just appeals to me. I like being physically involved in the tuning process.

This also feeds my want to fix things myself. With plenty of available parts and documentation, I can muddle through just about anything that doesn’t require a degree in electrical engineering to figure out. I want this to be a learning experience, and if I can’t open the case and solder a few components, I’ll never learn.

Finally, I want the ability to modify my transceiver to become whatever kind of Frankenstein I want it to be come. I want it to be mine, and fail or perform as a result of my sweat and hot soldering iron. If there’s no battle scars by the time I’m done, I’ll not have learned a thing.

In conclusion, I really just wanted something of value that I can work with as a base for learning. This is a great hobby that I’ll be able to have fun with for years. I want a setup that will allow me to fulfill this need, and I believe that the Kenwood TS-430S will allow me to succeed.


Used Radio Market

Seems there are a lot of deals out there for good (older) used radios if you just look in the right places, and be patient. Places to look for the deals?

Depending on how adventurous and trusting of others, there are many places to turn. I’ll give you a run-down of sites I’ve browsed, with my opinion of safest to “feeling lucky?”

Safe: $$$ Places that won’t scam you

  • Ham Radio Outlet – Used equipment that they have looked at. http://www.hamradio.com/used.cfm

Some Risk: $$ Places that help to guard against scams

  • QRZ.com – This is the place where hams sell their gear, an are required to divulge who they are (callsign) and seems very geared toward reducing the risk of fraud. http://forums.qrz.com/forumdisplay.php?7-Ham-Radio-Gear-For-Sale
  • QTH.com – Lots of stuff for sale here, and great tips how to protect yourself. http://swap.qth.com/

Buyer Beware: $ If you know what you’re doing, you can make out with a great deal

  • Craigslist – Personal risk if meeting individual, but you should be able to see/test the equipment before you buy. http://craigslist.org/
  • eBay – Always understand what you’re buying, and check the sellers ratings. If *anything* looks fishy, don’t bite! Another thing I like to do is search for the product in google images just to see if the seller is using someone elses images for the item. If so, keep walking by.

How to buy?

You don’t have money to buy new, so you better plan so you can make the best of the money you have.

Always start with a budget, and (at least) general requirements of what you need, ie. $300 and HF operation with AM/CW/SSB capability.

Search for things that match your requirements, and start writing down the prices you’re seeing. Make notes as to the condition and sellers information. This may come in handy later if you have seen the item/seller often, and need to gauge how much the seller may be willing to negotiate.

You will start to get an idea of whether or not you will be able to purchase what you want within your budget quickly. The longer you can wait for a deal, the more success you’ll have in getting a lower price.

Also, the more open you are to things like wear and limited functionality, the more you can negotiate and save. If you’re not one that is handy with fixing things, be realistic and open your wallet.

Always remember that if you know what you like, don’t compromise! You’ll always be thinking “what if?”

Using this method, I was able to hone in on a used Kenwood TS-430S for $264 shipped from eBay. The seller said it functioned fine, and had a good seller rating and reviews. The pictures showed signs of wear and some oxidation on case screws. That meant that the photos weren’t edited, and ensured (to me) the “honest” nature of the posting. I took a gamble, and ended up with a radio that even contained an FM mode board that wasn’t even shown on the item description! Bonus! I’m very pleased with my purchase, and it didn’t break the bank, nor force me to compromise.

I hope your experience will be as good or better than my own venture. Good hunting!